Posts

Final Project: Art of the Moment

Image
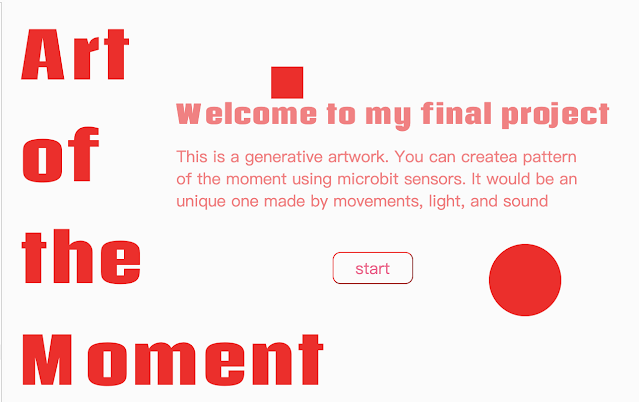
  My final project is called  Art of the Moment.  It was made using microBit and p5.js. The reason why I gave it this name is because that every moment incorporates the elements of movements, sound, light, and other elements, making it special and unique. Therefore, I thought about documenting the moment as a graphic pattern using microBit and p5.js. Last week, I documented how I made the prototype of the final project. I explained the concept of generative art, which gave everyone chances to be a part of the artwork through interactions with the project.  This week I worked on realizing more complicated patterns. To realize it, I used the sound sensor, the light sensor, and the rotating sensor to input the value of the light, sound, and movement in a specific context. In this way, the pattern will be changed in different ways.  Made an intro page  Before starting play around, the audiences will see the name of this project and a brief introduction about it. In this part, I used HTML a

Final Project Prototype: Generative Art

Image
  For my final project, what I think about is to make a piece of interactive artwork. Users can create unique patterns through interacting with the artwork. When I googled "interactive art p5.js" for inspirations, I saw a concept that is mentioned many times -- generative art. The pictures above are examples of generative art by Katharina Brunner. According to Wikipedia, Generative art  refers to  art   that in whole or in part has been created with the use of an autonomous system. An autonomous system in this context is generally one that is non-human and can independently determine features of an artwork that would otherwise require decisions made directly by the artist.  Therefore, I would like to say what I want to explore in my final project is generative art. STEP 1 Connect microBit to p5.js In the beginning, I revisited last week's resources to connect microBit to p5.js. At the trial stage, I used three input values from the sensors and button: roll, pitch, and but

Create Button Press and Key Press Events in p5.js

Image
Creating button-press and key-press events can add more interactive fun to the program. The picture above shows the "Hello" text I wrote using my program. In this program, users can change colors, clear canvas, change stroke weights, and change background colors by pressing buttons and keys.  https://editor.p5js.org/hh2871/sketches/-sXGieDYf In the setup function, I set up the background color, the size of the canvas, stroke weight, and filling color first. Besides, I also preset the positions, texts, and event triggers of the four buttons. After this, I defined the functions of each button and the functions of keypress events. The function of fill() is to change colors. The function of strokeWeight() is to change the stroke weight. The function of background() is to change the background color.

Learn how draw with p5: A Chinese lantern

Image
  https://editor.p5js.org/hh2871/sketches/diyXJRSYG  Why do I choose lantern? Because lantern is a meaningful symbol for Chinese people. It stands for coming back home or reunion with family. Therefore, Chinese people like hanging out lanterns during traditional festivals as a good blessing.  How do I make it? First, I drew a picture of it.  I broke it down into several parts: the top, the body, the bottom, the fringe, and the decorations(a line and a square). For each part, I used basic shapes, like squares, rectangles, lines. The body part is special because of its irregular shape. Therefore, I used vertex() to sketch it out. The last step is to color different parts. I messed up with coloring since I used color() instead of fill(). And, I learned that every time I want to apply different colors, I need to reset the RGB.

Interactions Between Two Microbits & Connect Scratch with Microbit

Image
  Interactions between two microbits  To make a project that uses communication between two Microbits, I chose a project from the list, which is called Heartbeat beacon. A heart pattern will show up in a microbit when it receives a string signal from another microbit.  At the start, I prepared two microbits: one as a receiver, one as a transmitter. They had the same preset code to set the radio set group and radio set transmit power. For the transmitter, there is a forever loop to transmit radio. For the receiver, there is a trigger to show a heart icon when it receives a string signal.  For fun, I modified the code. After sending a string, the transmitter will send a number. It is still a forever loop. At the same, I added a new code to the receiver, making it react to the number signal showing a smile icon.  It is interesting to compare Makecode with Javascript. I found it a little bit different from js that I learned before. Here are some guesses based on my knowledge of js: 1. radi

Get to know more about microbit

Image
Last week, Prof. Dec introduced another creative technology -- microbit.  At the first time when I hold it in my hand, I wondered how much fun this tiny thing could bring. However, I was totally obsessed with its magic power when I started exploring it.  source from https://kidscodejeunesse.org/microbit Beginner Projects  I start from the very first challenge, to show heart image. Then, make a heart beat.  There are many sensors built in microbit, like temperature, action, movement, sound, bearing, etc. I tried many. Here is one example of the light sensor.  Intermediate Project In the intermediate projects, I found an interesting project, which is called electronic pet. When I was a kid, I used to have a tiny machine called tomagotchi, having an electronic pet inside. Therefore, I decided to do this project. They’re small gadgets that you can keep on your keyring. A creature is shown on a simple display. You have to look after it, interacting with it by pressing buttons and playing si

Scratch Mini-project: Simple MP4 & Remix

Image
During the past few weeks, I worked on a mini-project using Scratch. This small piece is an MP4 player, to be more specific, it is a music player. I tried to simulate the real user journey in a music player, like turn on and off, next and previous song, pause and start a song, etc.  Week 1  In week 1, I just grabbed some thoughts about the mini-project. I thought of making a storytelling project, demonstrating the great fun brought by MP4 during my childhood. But I decided to make an interactive virtual MP4, which could be more interesting since people can interact with it. Due to the time pressure, I just forked the music player function of the MP4 player. Week 2 Before starting to use Scratch to create the project, I made a plan first to sort out my sort of random thoughts. They are many functions of a music player. I need to decide put which functions into priority. I made a list to map the user interactions in sequence: 1.  turn off/on the device   2. see a central interface  3. ge